Companion Scan Quest
Scan a room with a Meta Quest 3 and open the result in a desktop viewer. Companion Scan Quest is a WebXR app that runs in the Meta Quest Browser. It places pins from the headset’s own room model, adds object detections when a CV server is available, and exports a GLB file with a Markdown scan report.
This page covers Companion Scan Quest, not Companion Scan. Companion Scan is a different app: a phone scanner and desktop world editor that you install from the Companion Hub App Store. Companion Scan Quest is a web page for the Meta Quest 3. There is nothing to install.
Pre-release. Status on 2 November 2026.
- Scene capture, export, and the desktop viewer don’t need a sign-in or a server. They have not been run on a headset yet.
- Sign in with Companion Intelligence and memory-server discovery are in the app, but they can’t complete yet. Two changes outside the app are pending: the Companion Portal (the service behind your CI Account) must register
ci-metaas a public client with the redirecthttps://meta.ci.computer/, and CI-Server (the Companion Memory server) must acceptci-metain its memory audience list. Neither is done. See Sign-in status. - The app is deployed at
https://meta.ci.computer, and the address resolves.
Screenshots
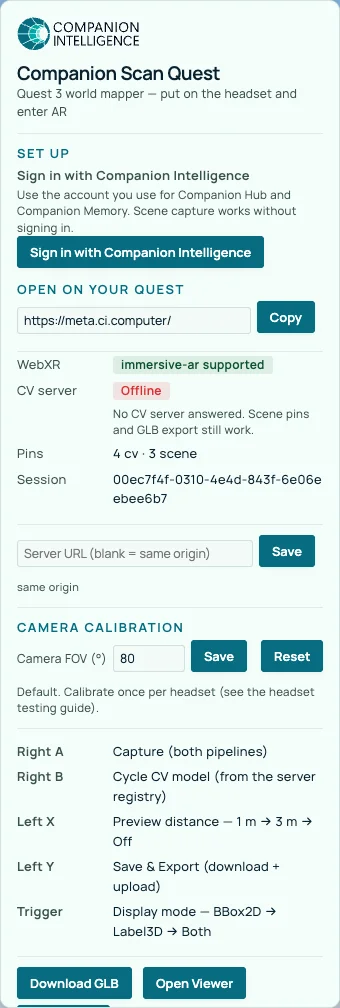
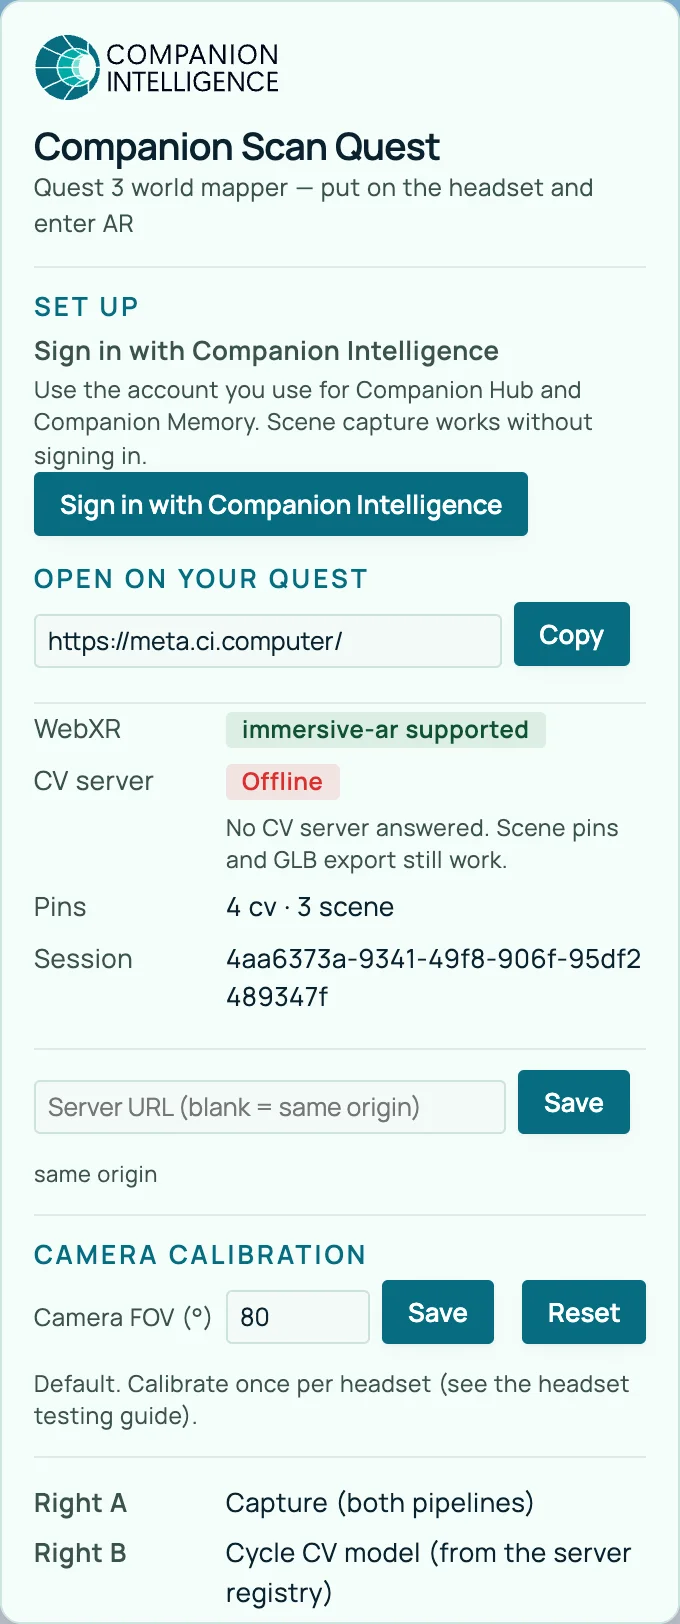
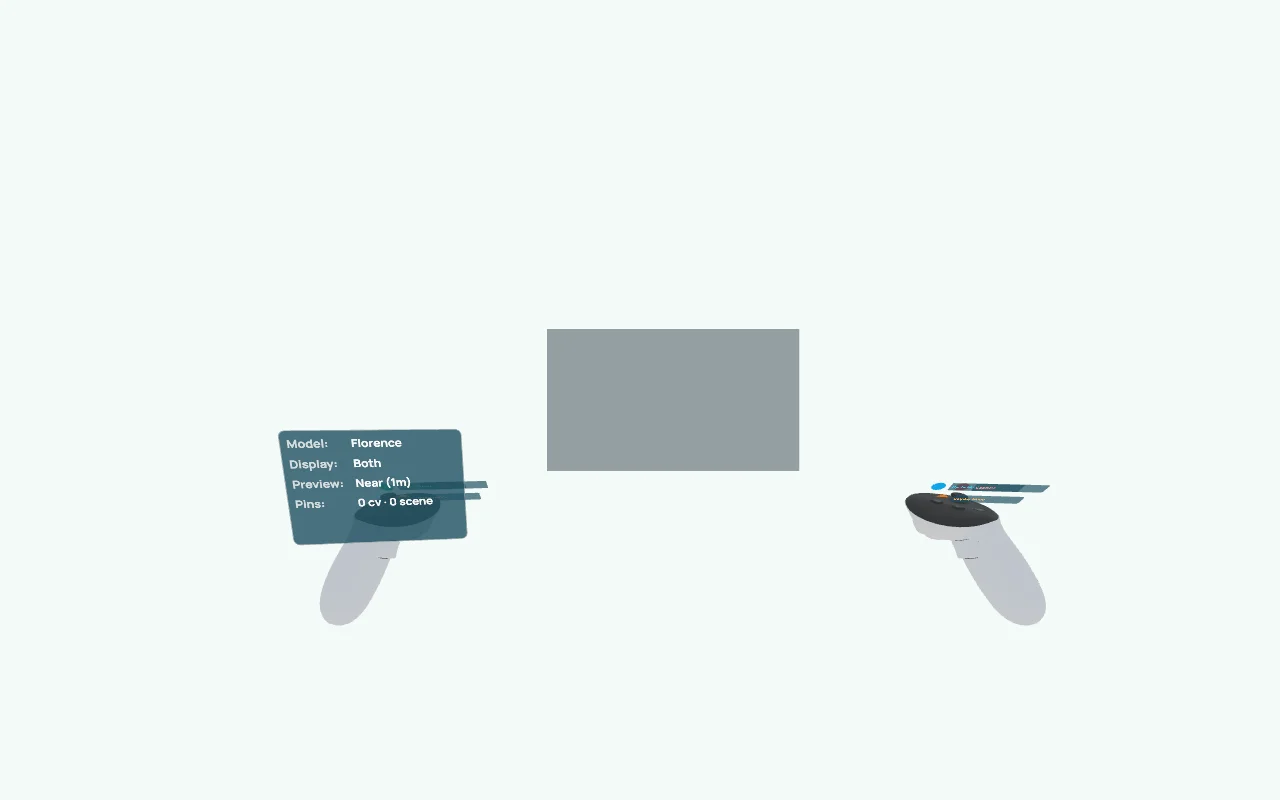
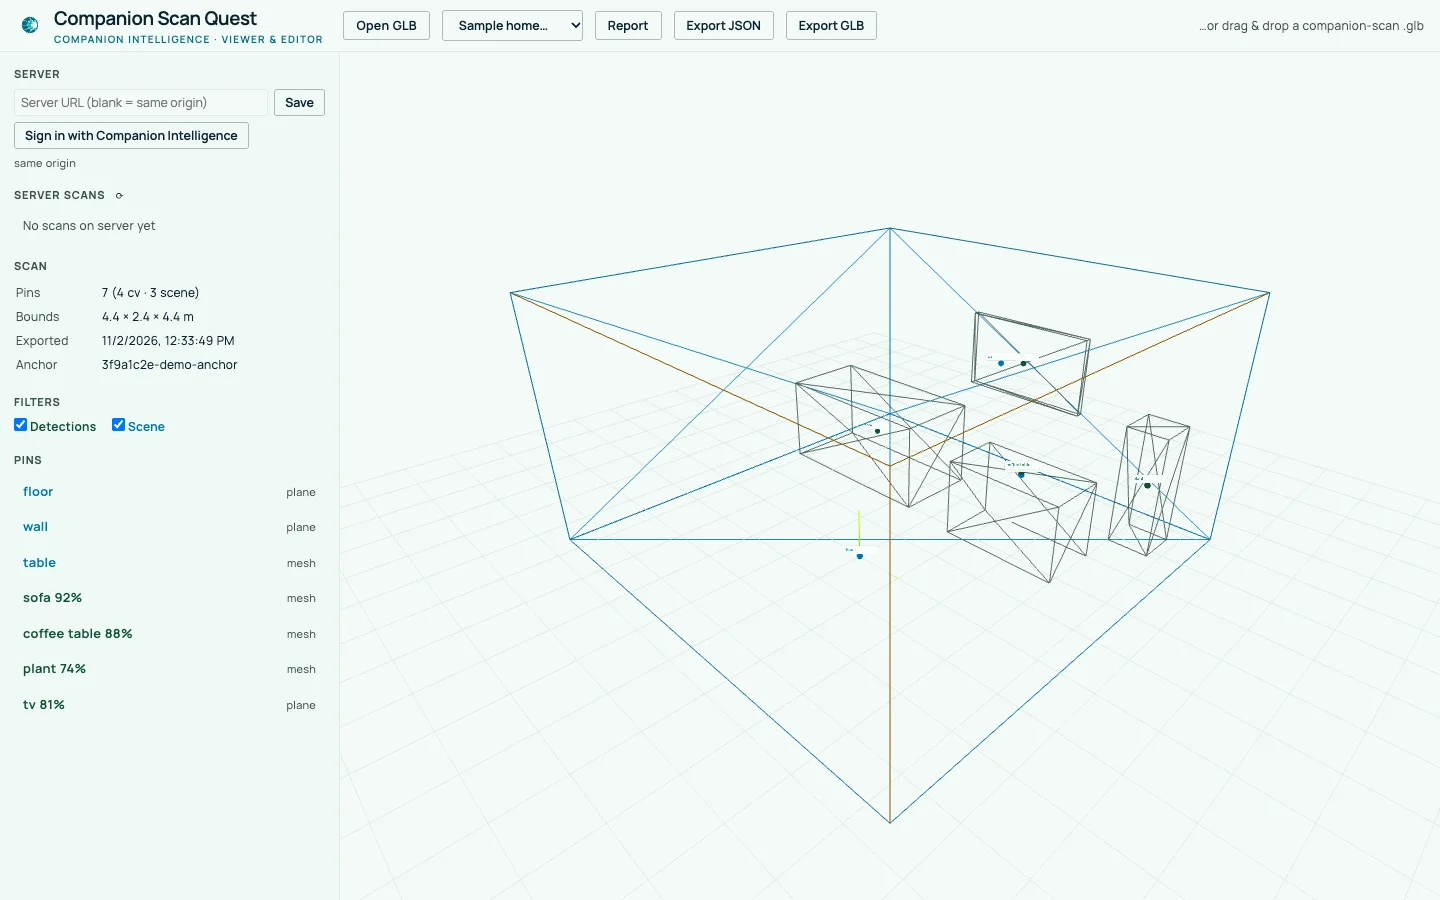
The desktop shots use a sample scan: four detections and three scene pins. The headset is an emulated Quest 3 (IWER), not a real device, so these show the interface, not a room you have scanned.
Install and availability
| Runs on | Meta Quest 3, in the Meta Quest Browser |
| Install | None. The app is a web page. |
| Address | https://meta.ci.computer. A Cloudflare Worker serves the static app and a few /api routes. |
| Accounts | None needed. Sign-in is optional and isn’t available yet. |
| Servers | None needed. An optional CV server adds object detection. |
| License | PolyForm Noncommercial 1.0.0 |
| Source | CI-Spatial-Web-Meta , folder webxr-ar-ai/ |
What you need
- A Meta Quest 3.
- The Meta Quest Browser. The app asks for an
immersive-arWebXR session with plane detection, mesh detection, and anchors. In a browser that can’t start that session, such as a desktop browser, the status panel reports thatimmersive-arisn’t supported and says to open the page in the Meta Quest Browser. - The link to open on the headset. Open the app’s address in a desktop browser. The Open on your Quest block shows the page’s address with a Copy button. Select Copy, then paste the link into the Meta Quest Browser address bar. If the browser blocks copying, the field is selected so that you can copy the link by hand.
- Optional: a CV server. The
cv-server/folder in the repository runs Florence-2, Grounding DINO, and SAM 2 in Docker. It needs the NVIDIA Container Toolkit and an NVIDIA GPU, and the repository recommends 8 GB of VRAM or more. Without it, capture still places scene pins, and the status panel notes that scene pins and GLB export still work.
Scan a room
- Open the link in the Meta Quest Browser. The status panel shows the WebXR and CV server rows, the Pins count, and the controller legend.
- Enter AR. The app offers an
immersive-arsession to the browser. Select Enter AR in the browser’s prompt, and allow camera access when asked. The status panel hides while the session runs and returns when it ends. - Run Space Setup if the headset asks. If the headset reports no planes or meshes, the app starts the headset’s own room capture, Space Setup, about two seconds after the session starts. Complete it, then enter AR again.
- Capture. Look at part of the room and press Right A. Turn and capture again until you have covered the room.
A capture does two things:
- It saves the planes and meshes that the headset already knows as scene pins, labeled with the headset’s semantic label when it has one. Capturing the same surface again updates its pin instead of adding another.
- If a CV server answers, it sends one camera frame for detection and places each detection on the room geometry, along a ray from where you stood when the frame was taken. A detection whose ray hits no room geometry is placed at the preview distance, or at 2.5 m when the preview distance is off.
The left-wrist HUD shows the model, the display mode, the preview distance, the pin counts as cv and scene, and a status line. A finished capture reads, for example, 4 detections · 6 scene pins. If the detection request fails, the line shows the reason and the scene pin count in a warning color, for example CV server unreachable · 6 scene pins, and the scene pins are still placed.
| Control | Action |
|---|---|
| Right A | Capture |
| Right B | Cycle the detection model: Florence, GDino, or SAM2, or the models in the CV server’s list |
| Left X | Cycle the preview distance: 1 m, 3 m, off |
| Left Y | Save and export |
| Either trigger | Cycle the display mode: BoundingBox2D, SpatialLabel3D, Both |
Labels on the controllers show these actions once the controllers are tracked.
Where a detection lands depends on the passthrough camera’s field of view, which the browser doesn’t report. The default is 80°. Set Camera FOV (°) in the Camera calibration section of the status panel and select Save to store a value for that headset. A ?hfov= value in the address overrides the saved value while it stays in the address.
The app saves the scan in the browser after each capture: the pins in local storage and the room geometry in IndexedDB. A reload restores both, so an export still contains the room. Clear Scan on the status panel removes them.
Export the scan
Press Left Y, or select Download GLB on the status panel. Both save two files to the browser’s download location, which is the headset’s Downloads folder in the Meta Quest Browser:
companion-scan-<timestamp>.glbholds the room geometry that the headset reported, plus anextras.companion_scanblock with the scan metadata: a format version, the session ID, the export time, the anchor UUID, every pin, and the floorplan bounds. A pin records its label, source, confidence, position in session coordinates and relative to the anchor, hit type, placement confidence, and, when present, the semantic labels, extents, SAM 2 mask, and Florence-2 caption.companion-scan-<timestamp>.mdis a Markdown report of the same scan: the session, export time, anchor UUID, pin counts, room bounds, a table of room surfaces, a table of detected objects, and the Florence-2 scene descriptions.
Left Y then uploads the GLB to the server in the Server field, which is the page’s own address when the field is empty. Download GLB doesn’t upload. The status line reads Exported <path> when the upload works. If no server accepts it, the line reads Saved <file> · upload failed, and the files are still saved.
View the scan on a desktop
Copy the GLB from the headset to your computer, or use a CV server that stores uploads. Then open /viewer.html on the app’s address in a desktop browser, or select Open Viewer on the status panel.
- Load a scan. Select Open GLB, drag a
.glbfile onto the page, or select a file in Server scans, which lists the scans stored on the server in the Server field. - Look around. The viewer draws the room geometry as a wireframe and each pin as a sphere with its label. The Scan table shows the pin counts, the bounds, the export time, and the anchor UUID. Under Filters, clear Detections or Scene to hide those pins.
- Edit a pin. Select a pin in the Pins list to move the camera to it. Change its Label, Confidence, Position (X, Y, Z), or Caption, then select Apply, or select Delete. The floorplan bounds are recomputed from the remaining pins, leaving out pins that were placed at a guessed distance.
- Export again. Report saves the Markdown report, Export JSON saves the scan metadata, and Export GLB saves the edited scan as a new GLB.
- Try it without a headset. The Sample home… menu loads one of 24 sample homes as editable test data.
What sign-in adds
Sign-in is optional. When it works, it adds one thing: the app finds your Companion Memory server and its language models, and you choose the server with one tap. It doesn’t change how scene capture, export, or the viewer work, and it doesn’t change how the app talks to a CV server.
- The same account as Companion Hub. Sign in with Companion Intelligence signs you in with your CI Account, the account you use for Companion Hub and Companion Memory. It uses OpenID Connect with the Authorization Code flow and PKCE (S256) against the Companion Portal at
https://hub.ci.computer, and asks for the scopesopenid,profile, andemail. The app is a public client with the client IDci-metaand no client secret. The app’s Worker exchanges the code at/api/oauth/token, because the Portal doesn’t allow the app’s address to call its token endpoint. - Automatic discovery. After you sign in, the Worker asks the Portal which Companion Memory servers are on your account. It checks each server’s health, and for each server that answers it reads the language models and notes which ones have vision. You don’t tap anything for this step.
- A one-tap choice. When a server is healthy, the Set up block offers a button that reads
Use <name>. Select it to save that server’s address in the browser. The block then readsUsing <name>. - Nothing is sent yet. The app doesn’t send scan data to the chosen server, and it doesn’t use the server’s language models. It saves the choice and shows it in the Set up block. Nothing else uses it yet.
Sign-in status
Sign-in and discovery are in the app, but they can’t complete yet. Two changes outside the app are pending, and neither is done:
- The Companion Portal must register
ci-metaas a public client with the redirecthttps://meta.ci.computer/. - CI-Server, the Companion Memory server, must accept
ci-metain its memory audience list.
Until both land, sign-in and discovery can’t complete. Scene capture, export, and the desktop viewer aren’t affected.
The Set up block
The Set up block is at the top of the status panel. The panel belongs to the 2D page, so you sign in and choose a server on the page before you enter AR, either on a desktop or in the Meta Quest Browser window. When you return to the page already signed in, the app looks up your servers by itself.
| Step | What the block shows | What happens |
|---|---|---|
| Sign in | Sign in with Companion Intelligence, with a note that you use the account for Companion Hub and Companion Memory. | The browser goes to the Portal. The Portal returns you to the app’s root address with a code, and the app exchanges the code through its Worker. |
| Find | Signed in as <email>, then Found <name> with a language-model count, for example 2 language models, 1 with vision. | The app finds your servers by itself. The button reads Find my servers until a search has run, and Find my servers again after that. |
| Use | A button that reads Use <name> | The block reads Using <name>. The Use <name> button goes away, and the other button reads Find my servers again. |
Limits
- The Worker reads up to three Companion Memory servers and up to 50 language models per server. Each health check and model request times out after five seconds.
- The Worker calls only
https://addresses, andhttp://addresses on the local machine for development. It can’t use a server with any other address. If none of your servers has a usable address, the block says so. - If more than one server is healthy, the block offers the first one. It has no picker.
- A sign-in lasts as long as its access token. The Worker returns no refresh token, so you sign in again after the token expires.
- The session, the Server address, and the chosen memory server are stored per browser. Settings saved in a desktop browser don’t appear in the Meta Quest Browser.
- Sign out clears the session in that browser. On the status panel it also clears the chosen memory server. It keeps the Server address.
What works without an account
Everything described above under scanning, exporting, and viewing works without an account and without a server:
- Scene capture on the headset, with scene pins from the headset’s room model.
- Saving the scan in the browser and restoring it after a reload.
- Export of the GLB and the Markdown report to the headset’s Downloads folder.
- The desktop viewer and editor, including Open GLB, drag and drop, and the 24 sample homes.
A CV server adds object detections and a place to store uploaded scans. An account adds the memory-server discovery described in What sign-in adds, and nothing else.
Connect a CV server
The Server field on the status panel and in the viewer sets the base address of a server that speaks the CV server’s API. Leave it empty to use the page’s own address. Three details matter for the hosted app:
- The page’s Content-Security-Policy lets it connect to its own address and to
https://addresses, so a CV server used from the hosted app needs anhttps://address. - The CV server must allow the app’s address in its CORS settings. The
CORS_ALLOW_ORIGINSsetting incv-server/docker-compose.ymldefaults to*. - The setting is stored in the browser that you set it in. Opening the app once with
?server=https://your-hostadded to the address saves the server and removes the parameter from the address bar. Use a link like that to set the server in the Meta Quest Browser.
How it works
flowchart LR
    accTitle: Companion Scan Quest: headset app, Worker, Portal, memory servers, optional CV server, and desktop viewer
    Q["Meta Quest Browser<br/>WebXR app and status panel"]
    W["Worker on meta.ci.computer<br/>static app and /api routes"]
    P["Companion Portal<br/>hub.ci.computer"]
    M["Companion Memory servers<br/>listed by the Portal"]
    C["CV server, optional<br/>Florence-2 · Grounding DINO · SAM 2"]
    F[("Headset Downloads<br/>GLB and Markdown report")]
    D["Desktop viewer<br/>/viewer.html"]
    Q -->|"app files and /api calls"| W
    W -->|"token exchange, user info, app listing"| P
    W -->|"health check, language models"| M
    Q -->|"camera frames, GLB upload"| C
    Q -->|"Left Y or Download GLB"| F
    F -->|"Open GLB"| D
    C -.->|"Server scans"| D
The Worker serves the built app from its static assets. For /api/* it runs first and answers four routes. It makes the calls to the Portal and to the memory servers itself, because the browser can’t call them from the app’s address:
| Route | What it does |
|---|---|
GET /api/health | Returns the Portal address and the client ID that the Worker is configured with |
POST /api/oauth/token | Exchanges the sign-in code for tokens, and accepts only this site’s root address (or a local address in development) as the redirect |
GET /api/session | Returns the account’s sub, email, and name from the Portal |
POST /api/discover | Lists the account’s Companion Memory servers from the Portal, then checks each server and reads its language models |
The Portal address and the client ID are the Worker’s CI_PORTAL_URL and CI_OAUTH_CLIENT_ID settings, https://hub.ci.computer and ci-meta by default. There is no client secret anywhere in the app or the Worker.
Troubleshooting
| What you see | What it means |
|---|---|
immersive-ar not supported or WebXR unavailable in the WebXR row | The browser can’t start an AR session. Open the page in the Meta Quest Browser on a Meta Quest 3. |
| The CV server row reads Offline | No server answered at the Server address. Scene pins and export still work. |
CV server unreachable · 6 scene pins, in a warning color | The detection request failed. The scene pins were placed, and no detections were. Other reasons are CV server timed out, CV server error with a status, and Camera not ready. |
Saved <file> · upload failed | The files are in the headset’s Downloads folder. No server accepted the upload. |
0 scene pins after a capture | The headset reported no planes or meshes, so it has no room model. Run Space Setup from the headset, then reload the page. |
Sign-in did not start: Sign-in is not available right now. Try again later. | The page couldn’t read the Portal address and client ID from /api/health. |
That sign-in did not start in this browser. Start it again. | The state value in the return from the Portal didn’t match the sign-in that this browser started. |
Companion Intelligence did not complete the sign-in. Start again. | The Worker’s code exchange with the Portal was refused. |
| Memory discovery is not available yet | The Portal didn’t list your memory servers for this app. Scene capture still works. |
| No memory server on this account | The Portal lists no Companion Memory server for your account. Install Companion Memory from Companion Hub, then select Find my servers again. |
<name> has an address this app cannot use | The server’s address isn’t https://. Check its address in Companion Hub, then find servers again. |
<name> is not responding | The health check got an error status or no answer. The block says which. Find servers again later. |
Its language models need a sign-in the server accepts. | The server passed its health check, but it didn’t return a language-model list for this sign-in. |
Your sign-in has expired. Sign in again. | The Portal refused the stored sign-in. Select Sign in with Companion Intelligence. |
Source and license
Companion Scan Quest is free for noncommercial use under the PolyForm Noncommercial License 1.0.0 . The repository’s LICENSE has the full text. The app is the webxr-ar-ai/ folder of the repository, and the CV server is the cv-server/ folder.
Links
- GitHub repository (companionintelligence/CI-Spatial-Web-Meta) : source, PolyForm Noncommercial 1.0.0
- Companion Scan: the phone scanner and desktop world editor, a different app
- Companion Memory: the server that discovery looks for
- Account and login: your CI Account
- Architecture of the public Companion systems